
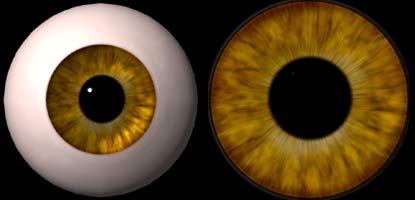
Here is an image of the surface map and how it appears mapped onto the eyeball object:
And another tutorial is here for Max: eyeball-tutorial-max
My tutorial only covers creating the Iris texture map Fair warning: This tutorial is a little on the long side. There are 12 layers to this map and I have separated the tutorial into 1 page per layer. I'm guessing it will take anywhere from 30 to 60 minutes to complete, depending how familiar you are with Photoshop.
BTW, a really nice guy by the name of Izzy Long was very generous to donate a Photoshop action that he created to somewhat automate the steps of this tutorial. I mean, this guy stayed up until 7:30 in the morning creating this action! He claims he does not have a life. :-) So if you are too lazy, er, I mean to busy to go through the steps yourself, download the zip file here that contains the action and a read me file. And if you want to go visit Izzy, you can get there from here
Keep in mind when you run the action that when you are asked to create a new file in Photoshop, make sure that at the bottom of the dialog box under "contents" you have "white" checked off.
Okay, may as well get going here . . .
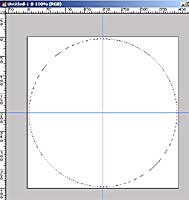
First open Photoshop. Then click on the File menu and then New. Make the new image file 400 pixels by 400 pixels at 72 dpi. Make sure the mode is set to RGB Color. Click on the OK button.
Next, grab your elliptical marquee tool from the toolbar, hold down the shift and alt keys together, click in the center of the image window and holding down the mouse button drag to the right until the circular marquee fills the window. Holding down the shift key constrains the elliptical tool to a perfect circle and the alt key allows you to create a circle by dragging from the center of the circle instead of from the outside edge of the circle. (I used guides in Photoshop to map out where the center of the canvas is).
Well, let's get on with the rest of the tutorial . . . Next Step>